Using PHP for Cisco IP Phone Apps

One of the advantages that IP phones have is the ability to create custom applications that can perform any number of functions. PHP and other dynamic web development languages can be used to create a great deal of functionality. The following is a simple application that prints one of three quotes to the phone. PHP or another dynamic language could be used to query databases, websites, etc. for any kind of data you may want accessible from a phone.

The text below was saved as “quote.php” on a PHP enabled web server, and added as a standard XML app. Due to the layout of the blog, you are probably better off copying this into your favorite text editor.

<?php header(‘Content-type: text/xml’); ?> <!– Without this line, the phone will not parse this as XML. Must be the first line of the script –>
<CiscoIPPhoneText> <!– Puts text on the phone screen–>
<Title>Today’s quote is:</Title> <!– This displays on the top, over the main text area–>
<Prompt>Why do you ask?</Prompt> <!– This displays on the bottom, under the main text area–>
<Text> <!– This assigns the actual text on the phone–>

<!– The PHP function defines an array of quotes, and posts one to the text area–>
<?php
$quote = [“To be or not to be, that is the question”, “Everybody comes to Rick’s”, “Follow the white rabbit”];
$rnum = rand(0,2);
print($quote[$rnum]);
?>
</Text>
<SoftKeyItem> <!– Define a softkey. The ones here are the defaults, and the app doesn’t really need them.–>
<Name>Update</Name> <!– The name that displays–>
<URL>SoftKey:Update</URL> <!– The URL or an action–>
<Position>1</Position> <!– The softkey position–>
</SoftKeyItem>
<SoftKeyItem>
<Name>Exit</Name>
<URL>SoftKey:Exit</URL>
<Position>3</Position>
</SoftKeyItem>
</CiscoIPPhoneText>

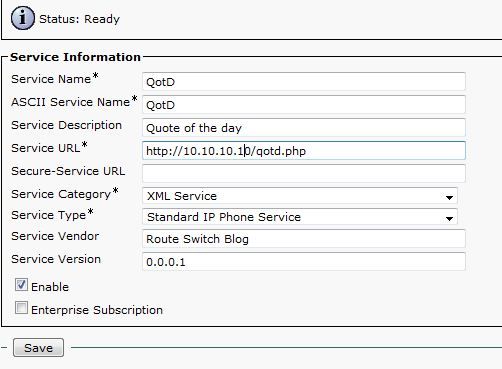
The app is added to CUCM as an XML Service:

The app on a phone:

Also see: Cisco Unified IP Phone Services Application Development Notes, PHP books at Amazon.com

Implementing SPAN

Switched Port Analyzer (SPAN) is a means of redirecting traffic from one switch port to another for analysis. An example would be capturing the traffic to a host with a PC running a program like Wireshark. Setting up SPAN is a relatively simple operation, consisting of creating a monitoring session by specifying a source and destination. Multiple SPAN operations can be active on a switch at any given time, depending on the hardware platform.

To specify a source,  the port with the host to be monitored, issue the following command:

monitor session <session number> source interface <interface name> [rx|tx|both]

The session number is a locally significant value, used to match the source to the destination. This value must match in both commands. The RX, TX, or Both keyword limit the traffic captured to received or transmitted traffic only, or both directions. If no option is specified, bidirectional traffic will be captured.

To specify the destination, the port with the traffic analyzer, issue the following command:

monitor session <session number> destination interface <interface name>

Once both commands are configured, all traffic to and from the source port will be mirrored to the destination port, and can be captured with some sort of traffic analyzer. By default the destination port will not pass other traffic while in SPAN destination mode.

Here is an example of the configuration, as well as verification with the “show monitor session” command.

Switch(config)#monitor session 1 source interface fastEthernet 0/24
Switch(config)#monitor session 1 destination interface fastEthernet 0/23
Switch(config)#end
Switch#sh monitor session 1
Session 1
———
Source Ports:
RX Only:       None
TX Only:       None
Both:          Fa0/24
Destination Ports: Fa0/23

Assigning permissions in UCM

Cisco Unified Communications Manager allows for very granular assignment of permissions, using the concept of roles and groups to assign specific permissions to users. A role is a list of permissions around a function, and a group is a list of roles, which can then be assigned to a user.

Permissions are assigned to Roles. An example of a role might be “Backup Administrator,” with permissions like “DRF Restore Warning Page,” “DRF Schedule Page,” “DRF Show Dependency Page,” and “DRF Show Status Page.” A role is specific to an application group, such as Cisco Unified Reporting, Cisco Call Manager Serviceability, or Cisco Call Manager Administration.

Permissions can include Read and Update, so a user could be given rights to view configuration elements, but not update them. This could be useful for auditing purposes, or for users that may need to verify a configuration, but not change it, such as a helpdesk user.

An Access Control Group contains a list of Roles. An Access Control Group might be something like “OS Administrators” which could include Roles like “Backup Administrator,” “LDAP Administrator,” etc. While a Role is specific to an Application, an Access Control Group can contain Roles from different Applications to create a comprehensive list of permissions, while limiting the number of groups a user must be assigned to to properly do their job.

Users are assigned to groups either in End Users configuration or in Access Control Group Configuration. Configuring in End User configuration is usually more efficient at assigning multiple groups to a user, while Access Control Group Configuration is going to be better for assigning multiple users to a single group.

Although you can see roles assigned to an end user in the End User Configuration Page, roles are not assigned directly to users. Users are assigned to groups, which contain roles, and the roles contain specific permissions within an application.

Configuration example after the fold.

Continue reading

Adding comments to debugs

When reading debugs, I often use a page or so of blank prompts to separate various things (VoIP calls, etc.) by hitting enter a bunch of times. You can also add comments to the break by prefixing them with an exclamation point.

router#
router#
router#! inbound call 1
router#
router# 

This makes finding the breaks between calls, VPN setup attempts, etc. a lot easier.

Converting DSCP AF values to decimal

To convert DSCP AF values to decimal, multiply the first digit by 8, and the second digit by 2, and add the two values:

AF21 – (2*8) + (1*2) = 18

AF31 – (3*8) + (1*2) = 26

The process can be reversed by deviding the decimal value by 8, and the remainder by 2:

30 – 30/8 = 3, remainder of 6, 6/2 = 3 = AF33

CS codes can just be converted by multiplying by 8, CS3 = 24

Decrypting router passwords with a router

The command “show key chain” shows the decrypted key strings, and because of that, can be used to decrypt other type 7 passwords:

R1(config)#username cisco password cisco
R1(config)#do show run | include password 7
username cisco password 7 05080F1C2243
 password 7 ****
R1(config)#key chain CRACK
R1(config-keychain)#key 1
R1(config-keychain-key)#key-string 7 05080F1C2243
R1(config-keychain-key)#do show key chain
Key-chain CRACK:
    key 1 — text “cisco”
        accept lifetime (always valid) – (always valid) [valid now]
        send lifetime (always valid) – (always valid) [valid now]
R1(config-keychain-key)#

Configuration mistake bailout

A lot of times we need to make changes on a router or switch that could break connectivity, and often these need to be done from a remote location, and after hours. Instead of keeping someone in the office or on call, here is a much easier bailout. Before you begin to make the changes, issue the command reload in 10 to schedule a reload in 10 minutes (replace 10 in the command with the number of minutes if 10 doesn’t work.) After you make the changes, if you lose connectivity, the router reboots, reverting to the old configuration, or you can issue the reload cancel command to cancel the reload if everything goes well.

Exchange and Zone-Based firewalls

I ran into some issues with Exchange running through Zone-based firewalls, where the servers would not pass mail between them. This appears to be related to SMTP inspection rejecting the ESMTP commands Exchange uses. The problem can be resolved by creating a class for SMTP between your mailservers, and configuring it with a pass action, instead of inspect. Just remember that you need to create rules in both directions, and the class must be before any classes that would inspect the traffic.

A Simple config would look something like this, with the mail servers at 172.16.1.10 and 172.17.1.10.

ip access-list extended ACL-FIREWALL-EXCHANGE
 permit tcp 172.0.1.10 0.255.0.0 172.0.1.10 0.255.0.0 eq 25
 permit tcp 172.0.1.10 0.255.0.0 eq 25 172.0.1.10 0.255.0.0
 ! The access-list matches traffic to or from either mail server 

class-map CLASS-FIREWALL-EXCHANGE
 match access-group name ACL-FIREWALL-EXCHANGE

class-map CLASS-FIREWALL-ALLOWED-PROTOCOLS
 match protocol HTTP
 match protocol HTTPS
 match protocol FTP 

policy-map type inspect POL-MAP-LAN-TO-WAN
 class  CLASS-FIREWALL-EXCHANGE
  pass
 class  CLASS-FIREWALL-ALLOWED-PROTOCOLS
  inspect 
 class class-default
  drop 

policy-map type inspect POL-MAP-WAN-TO-LAN
 class  CLASS-FIREWALL-EXCHANGE
  pass
 class  CLASS-FIREWALL-ALLOWED-PROTOCOLS
  inspect 
 class class-default
  drop 

zone security WAN
zone security LAN
zone-pair security WAN-TO-LAN source WAN destination LAN
 service-policy type inspect POL-MAP-FIREWALL-OUTBOUND
zone-pair security LAN_TO_WAN source LAN destination WAN
 service-policy type inspect POL-MAP-LAN-TO-WAN

interface e0/0
 zone-member security LAN

interface s0/0
 zone-member security WAN