In previous posts, we have looked at setting up the queues, skills, and agents for an ACD (Automatic Call Distribution) call center. In this post, we will take a look at setting up a very basic queuing script from a template, and creating an application to use it.
Scripts
Scripts how UCCX call flows are programmed. They are created in a custom GUI editor, which is largely drag and drop, but with a fairly powerful Java based back end that can add a large amount of flexibility to your scripts. Scripts define all aspects of how UCCX handles an inbound call (a contact in scripting parlance.) This post will not go into the creation of scripts in detail, that will come later.
Triggers
Triggers are the directory numbers that are dialed to interact with CCX. One or more triggers are assigned to an application. Triggers can be either a telephony trigger (a DN on CUCM) or an HTTP trigger (only available in CCX premium.) An HTTP trigger can do things like invoke a call from a web page that calls a customer, and places them in queue to be answered.
Telephony triggers are configured on the CCX server, which then uses AXL to create a CTI Route Point on the UCM cluster. In troubleshooting CCX, one of the first items to check is that the CTI Route Points (Triggers) and CTI ports (Call Control Groups) are registered.
All the configuration for triggers should be done on the UCCX server, not in CUCM
Applications
An application is a combination of a script, one or more triggers, and optionally a set of parameters assigned to the script. An application ties these things together so they can be used by CCX.
Parameters are variables in the script that you set to be change script behavior for different applications, which are then presented as options in the application web page. This allows a single script to be used for similar functions. For instance, if you are designing a setup for a a company that has 20 stores, that each need to say “Thank you for calling our store in <city>, please hold for the next available agent,” and then queue the call in an individual queue for each store, a single script could be created, and then the prompt and queue name fed in as parameters.
Create a Call Control Group
If no Call Control Groups are defined, create one now:
- In AppAdmin, choose Subsystems > Unified CM Telephony > Call Control Group.
- Click “Add New”
- Fill in a description.
- Configure the number of ports you want to configure
- MTP Support can usually be “No”
- Leave group type as Inbound.
- Configure a device name prefix, which will be used to create the ports. For instance, “UCCX” would create ports called “UCCX_<DN>”
- Starting directory Number will create numbers, incrementing up from the starting number. It will skip any numbers in use.
- Assign a correct Device Pool, Calling Search Space, Location and Partition.
- Click Add.
Creating a script
UCCX uses a dedicated GUI editor, which allows most of a script to be created graphically.
The installer for Cisco Unified CCX Editor is downloaded from an installed UCCX server. Log into App Admin (http://<server name or IP>/AppAdmin) on your server, navigate to Tools > Plugins, then click Cisco Unified CCX Editor, run or save and run the installer. There are no options, so just click “next” through the install.
Once the CCX Editor is installed, log in using the server’s name or IP address, and a user account with Administrator privileges on the CCX server. Prior to version 10, if authentication fails, the editor still starts, but logged in in anonymous mode. You must restart the editor to log in. In version 10, it say you failed authentication, and you must restart the editor, but it does not go through the entire startup, which can take a minute or two as the editor connects to the server.
For our demo, we are going to use one of the script templates included with the editor. Once you have the editor installed and logged in, click File > New, then select the Queuing tab, and the Simple_Queuing script, and click OK. A new script will be created, based on the Simple Queuing template. Once the script is created, right click one of the steps, and select “Expand All”
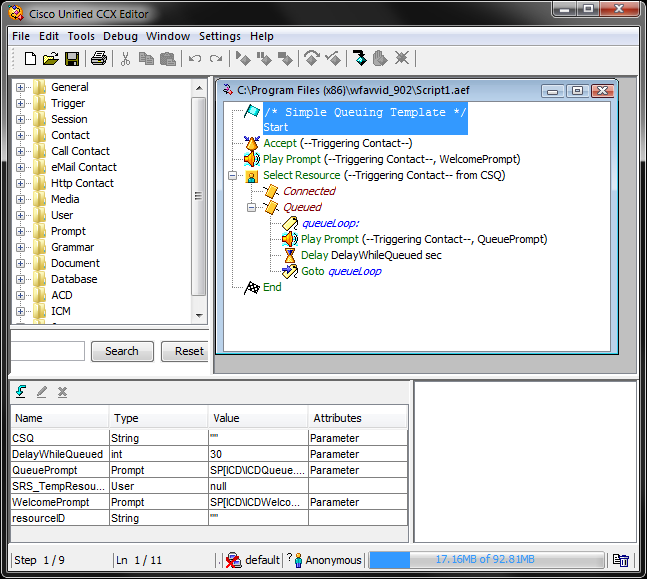
In the script, the first step is “start,” which, along with “End” will exist in all scripts, even if you create a blank one.
The “Accept” step answers the call.
The “Play Prompt” step plays a welcome prompt, specified in one of the prompt variables.
“Select Resource” attempts to select an agent skilled for the queue you specify. In this script, you specify the queue in a parameter variable, “CSQ.” This is free form text, so it is up to you to make sure it is a valid queue name.
Inside the Queued branch, the steps play a prompt, wait for the number of seconds specified in the “DelayWhileQueued” variable, and then loops.
Once the call is answered, it goes to the “Connected” branch, which is empty, so the script processes the next step, which in this case is “End.”
You can save the script directly to the repository by selecting “Script Depository” then “Default” in the save dialog box in script editor. If you save the script locally, you need to upload the script. In AppAdmin, select “Application” then “Script Management.” Click the “Upload Scripts” button, and follow the prompts to upload the .aef file.
Tying it all Together
An application is where all of this is tied together, so in the AppAdmin page, select “Applicaitons” then “Application Management.” A list of the currently configured applications is displayed. Click the “Add New” button. On the next page, select “Cisco Script Application” and click “Next.”
The “Cisco Script Application” page loads.
- Assign a name.
- The ID will fill in the next available number, which can be overwritten if needed.
- Maximum sessions assigns the maximum number of calls that can come into the application.
- Select the script we made in the last step. The page reloads, with the parameters configured in the script available to configure.
- Check the box in front of “CSQ” and fill in the name of a queue on the server. (See Part 1 for queue configuration)
- Fill in a description if you want, and click “Add”
Once the page reloads, click the “Add New Trigger” link on the left. A popup opens. Select “Unified CM Telephony Trigger” and click “Next.”
- Click the “Show More” button.
- Fill in the DN, a device name, and description. If your UCM installation is partitioned, assign an appropriate Partition and Calling Search Space.
- Most of the rest can be left as default, but set them as needed for your UCM installation.
- Click the “Add” button.
Testing
Log an agent in, go ready, and call into the trigger number from another phone. If everything is configured correctly, the first prompt should play, and the call gets transferred to the agent.
Interested in learning more? Read the rest of my UCCX information here.