Addressing Challenges Specific to Multi-Site Deployments

Deploying Unified Communications Manager to geographically diverse sites adds a number of challenges not experienced in single-site deployments. The primary new challenges are:

  • Bandwidth usage and call quality over WAN links
  • Availability during WAN outages
  • Call routing to the PSTN, especially for emergency numbers
  • Potential for overlapping dial plans

After the cut, we will take a brief look at each of these issues, and some ways to to overcome them.

Continue reading

Configuring Users with Mobile Connect (Single Number Reach)

Mobile Connect is Cisco’s trade name for what is often called Single Number Reach, or SNR. It extends a call to a user’s desk phone out to up to ten other phones, such as home and cell phones. This allows an employee to disseminate a single number, which can always be used to reach the user. This benefits customers and business partners, since they don’t need to try multiple numbers to reach someone, and the employee, since there is no way for the caller to know if you are in the office, at home, or on a golf course.

To do this, UCM makes calls to the PSTN for each off net destination, which requires some planning.While a call is being extended, this ties up one channel per remote destination, up to 10, plus the incoming call, if it is a PSTN call. Once the user answers on a remote device, up to 2 channels are taken up, one for the inbound call, one for the remote device, assuming they are both PSTN devices. The additional trunk usage should be taken into consideration before enabling Mobile Connect.

System Setup

The only real non-default setting for mobility is to create a new softkey template that includes the Mobility softkey. Normally, I would copy the “Standard User” softkey template to something like “Mobility User” and add the Mobility softkey to the On Hook, and Connected call states.

User Setup

Setting up Mobile Connect can be a bit frustrating due to some order of operation considerations. To remember the order of operations, I use the mnemonic UPPeD, standing for User, Phone, (Remote Destination) Profile, and (Remote) Destination.

Continue reading

MPLS basics

Over the last several years, we have seen a large push towards MPLS from carriers, and it has been added to the topics for the CCIE R/S.

When I started studying MPLS, I had a bit of trouble wrapping my head around it. I think the biggest reason for that is a basic misunderstanding; The MPLS that we are familiar with from carriers is actually MPLS VPN, so I was expecting that sort of behavior out of the underlying technology. This is kind of like trying to understand IP while expecting it to act like IPSec.

At a basic level, MPLS is a “Layer 2.5” encapsulation that is used primarily for forwarding IP packets, although there are other uses. It inserts a label (sometimes called a tag, especially in older versions of IOS) between the L2 and L3 headers.

 photo headers.gif

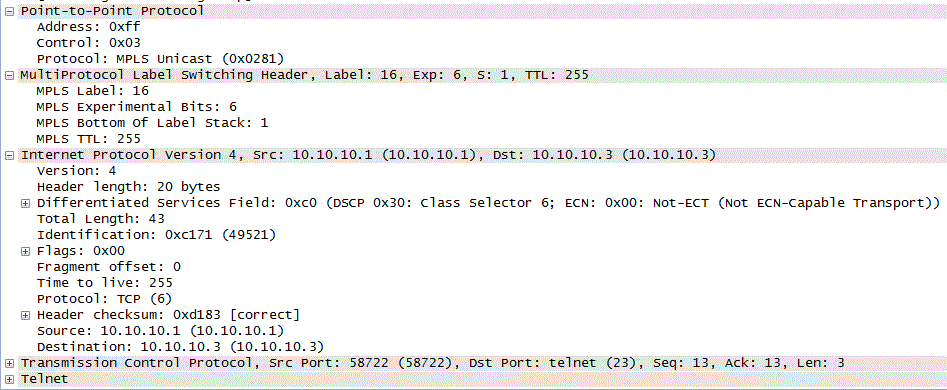
In this Wireshark screenshot, we can see the MPLS label is sandwiched between the L2 (PPP, in this case) and L3 (IP) headers.

The label consists of a label number (16, in this case) the Experimental bits, now used for QoS purposes, the Bottom of Stack (BoS) bit, and a Time to Live (TTL). The BoS bit indicates the last label, in case the packet has more than one label applied, for instance for MPLS VPN. The TTL functions like the TTL in IP, getting decremented at each hop.

Without anything like MPLS VPN running over it, the process goes something like this:

  1. The routing protocol on the router populates the routing table.
  2. Label Switch Routers use LDP to advertise a label value for each Forwarding Equivalency Class (FEC), such as IP route, or BGP next hop, to their neighbors.
  3. Each router builds it’s forwarding table (the CEF table on Cisco routers) based on the IP routing table and the label binding received from the next hop router.
  4. When the router receives a packet on an interface with a specific label, it looks up that interface/label combination, and finds the outgoing interface, label value, and L2 information, like the MAC address, of the next router. The router then swaps the incoming label for the outgoing label of the next router, encapsulates the frame, and forwards it.

The preceding is a simplified explanation of the steps, and in this very basic scenario, it doesn’t seem like there is much benefit to MPLS, and, if fact, with the speed modern routers can route IP, it seems to add unnecessary overhead. Generally MPLS would be used either for additional application such as MPLS VPN

BGP learned prefixes

While most routes are added to the Label Forwarding Information Base (LFIB) by IP prefix, BGP routes are added by next hop. With this behavior, all the interior routers in a BGP network need is a route and label mapping to the Provider Edge (PE) routers, not to the individual prefixes.

 photo topology.gif

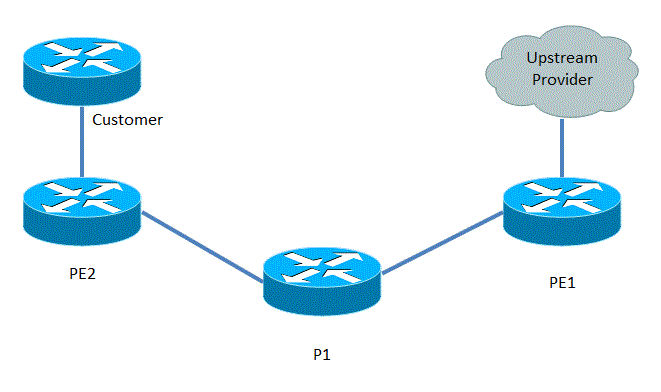
For example, we have a regional service provider, and we will look at a path from a customer to an upstream network. PE1 is the router between the regional carrier and the upstream network, PE2 is the connection to the customer, and P1 is a router internal to the carrier.  PE1 and PE2 are running BGP, and set next-hop-self on routes that they advertise, using their loopbacks. P1 is not running BGP, all three are running OSPF for routes internal to the provider network. PE1 advertises a tag to P1 (Actually, it would normally be to send an implicit-null, called Penultimate Hop Popping), and since P1 has a route to PE1’s loopback, it advertises a tag value to PE2. When PE2 receives a packet routed via BGP to the PE1, it uses the tag for PE1’s loopback. When P1 receives a frame from PE2, it does not have a route to the final destination, but knows from the incoming label  that the packet should be sent to PE1. It swaps the incoming label for the one that PE1 expects on traffic bound to it’s loopback, and forwards the frame.

The benefit to this is that the internal routers do not have to participate in BGP, saving resources on the routers, and administrative overhead in maintaining peerings. One disadvantage is that if a frame becomes unlabeled, the internal routers are not able to forward it.

Penultimate hop popping (PHP)

In the example above, PE1 would need to do a label lookup to determine that the packet was intended for it’s address, and then an IP lookup for the packet. P1 has to do a label lookup and swap. An optimization is to have P1 simply pop the label, then forward the packet to PE1 as an IP packet. In this case, the lookup and swap is basically the same on P1, but eliminates the label lookup on PE1. This is referred to as Penultimate Hop Popping.

MPLS VPN

MPLS VPN adds to the behavior for BGP by adding another label on the ingress router. BGP shares a label value between the two edge routers for the VPN. The VPN ingress router adds this to a packet bound for the remote VPN destination, then adds a second label for the path to the loopback of the egress router. As the packet is passed between the internal routers, only the “outer” label is swapped, until the packet arrives at the egress router, which pops (removes) the transport label, then looks up the VPN label, pops it, and forwards the packet to the VPN for that label.

The descriptions here are meant to be a high level look at MPLS, and are missing details and some possible options. Look for more MPLS posts here, or check out MPLS and VPN Architectures or MPLS Fundamentals.

Implementing SPAN

Switched Port Analyzer (SPAN) is a means of redirecting traffic from one switch port to another for analysis. An example would be capturing the traffic to a host with a PC running a program like Wireshark. Setting up SPAN is a relatively simple operation, consisting of creating a monitoring session by specifying a source and destination. Multiple SPAN operations can be active on a switch at any given time, depending on the hardware platform.

To specify a source,  the port with the host to be monitored, issue the following command:

monitor session <session number> source interface <interface name> [rx|tx|both]

The session number is a locally significant value, used to match the source to the destination. This value must match in both commands. The RX, TX, or Both keyword limit the traffic captured to received or transmitted traffic only, or both directions. If no option is specified, bidirectional traffic will be captured.

To specify the destination, the port with the traffic analyzer, issue the following command:

monitor session <session number> destination interface <interface name>

Once both commands are configured, all traffic to and from the source port will be mirrored to the destination port, and can be captured with some sort of traffic analyzer. By default the destination port will not pass other traffic while in SPAN destination mode.

Here is an example of the configuration, as well as verification with the “show monitor session” command.

Switch(config)#monitor session 1 source interface fastEthernet 0/24
Switch(config)#monitor session 1 destination interface fastEthernet 0/23
Switch(config)#end
Switch#sh monitor session 1
Session 1
———
Source Ports:
RX Only:       None
TX Only:       None
Both:          Fa0/24
Destination Ports: Fa0/23

Assigning permissions in UCM

Cisco Unified Communications Manager allows for very granular assignment of permissions, using the concept of roles and groups to assign specific permissions to users. A role is a list of permissions around a function, and a group is a list of roles, which can then be assigned to a user.

Permissions are assigned to Roles. An example of a role might be “Backup Administrator,” with permissions like “DRF Restore Warning Page,” “DRF Schedule Page,” “DRF Show Dependency Page,” and “DRF Show Status Page.” A role is specific to an application group, such as Cisco Unified Reporting, Cisco Call Manager Serviceability, or Cisco Call Manager Administration.

Permissions can include Read and Update, so a user could be given rights to view configuration elements, but not update them. This could be useful for auditing purposes, or for users that may need to verify a configuration, but not change it, such as a helpdesk user.

An Access Control Group contains a list of Roles. An Access Control Group might be something like “OS Administrators” which could include Roles like “Backup Administrator,” “LDAP Administrator,” etc. While a Role is specific to an Application, an Access Control Group can contain Roles from different Applications to create a comprehensive list of permissions, while limiting the number of groups a user must be assigned to to properly do their job.

Users are assigned to groups either in End Users configuration or in Access Control Group Configuration. Configuring in End User configuration is usually more efficient at assigning multiple groups to a user, while Access Control Group Configuration is going to be better for assigning multiple users to a single group.

Although you can see roles assigned to an end user in the End User Configuration Page, roles are not assigned directly to users. Users are assigned to groups, which contain roles, and the roles contain specific permissions within an application.

Configuration example after the fold.

Continue reading

Adding comments to debugs

When reading debugs, I often use a page or so of blank prompts to separate various things (VoIP calls, etc.) by hitting enter a bunch of times. You can also add comments to the break by prefixing them with an exclamation point.

router#
router#
router#! inbound call 1
router#
router# 

This makes finding the breaks between calls, VPN setup attempts, etc. a lot easier.

Converting DSCP AF values to decimal

To convert DSCP AF values to decimal, multiply the first digit by 8, and the second digit by 2, and add the two values:

AF21 – (2*8) + (1*2) = 18

AF31 – (3*8) + (1*2) = 26

The process can be reversed by deviding the decimal value by 8, and the remainder by 2:

30 – 30/8 = 3, remainder of 6, 6/2 = 3 = AF33

CS codes can just be converted by multiplying by 8, CS3 = 24

Exchange and Zone-Based firewalls

I ran into some issues with Exchange running through Zone-based firewalls, where the servers would not pass mail between them. This appears to be related to SMTP inspection rejecting the ESMTP commands Exchange uses. The problem can be resolved by creating a class for SMTP between your mailservers, and configuring it with a pass action, instead of inspect. Just remember that you need to create rules in both directions, and the class must be before any classes that would inspect the traffic.

A Simple config would look something like this, with the mail servers at 172.16.1.10 and 172.17.1.10.

ip access-list extended ACL-FIREWALL-EXCHANGE
 permit tcp 172.0.1.10 0.255.0.0 172.0.1.10 0.255.0.0 eq 25
 permit tcp 172.0.1.10 0.255.0.0 eq 25 172.0.1.10 0.255.0.0
 ! The access-list matches traffic to or from either mail server 

class-map CLASS-FIREWALL-EXCHANGE
 match access-group name ACL-FIREWALL-EXCHANGE

class-map CLASS-FIREWALL-ALLOWED-PROTOCOLS
 match protocol HTTP
 match protocol HTTPS
 match protocol FTP 

policy-map type inspect POL-MAP-LAN-TO-WAN
 class  CLASS-FIREWALL-EXCHANGE
  pass
 class  CLASS-FIREWALL-ALLOWED-PROTOCOLS
  inspect 
 class class-default
  drop 

policy-map type inspect POL-MAP-WAN-TO-LAN
 class  CLASS-FIREWALL-EXCHANGE
  pass
 class  CLASS-FIREWALL-ALLOWED-PROTOCOLS
  inspect 
 class class-default
  drop 

zone security WAN
zone security LAN
zone-pair security WAN-TO-LAN source WAN destination LAN
 service-policy type inspect POL-MAP-FIREWALL-OUTBOUND
zone-pair security LAN_TO_WAN source LAN destination WAN
 service-policy type inspect POL-MAP-LAN-TO-WAN

interface e0/0
 zone-member security LAN

interface s0/0
 zone-member security WAN