Impressions of the 8861

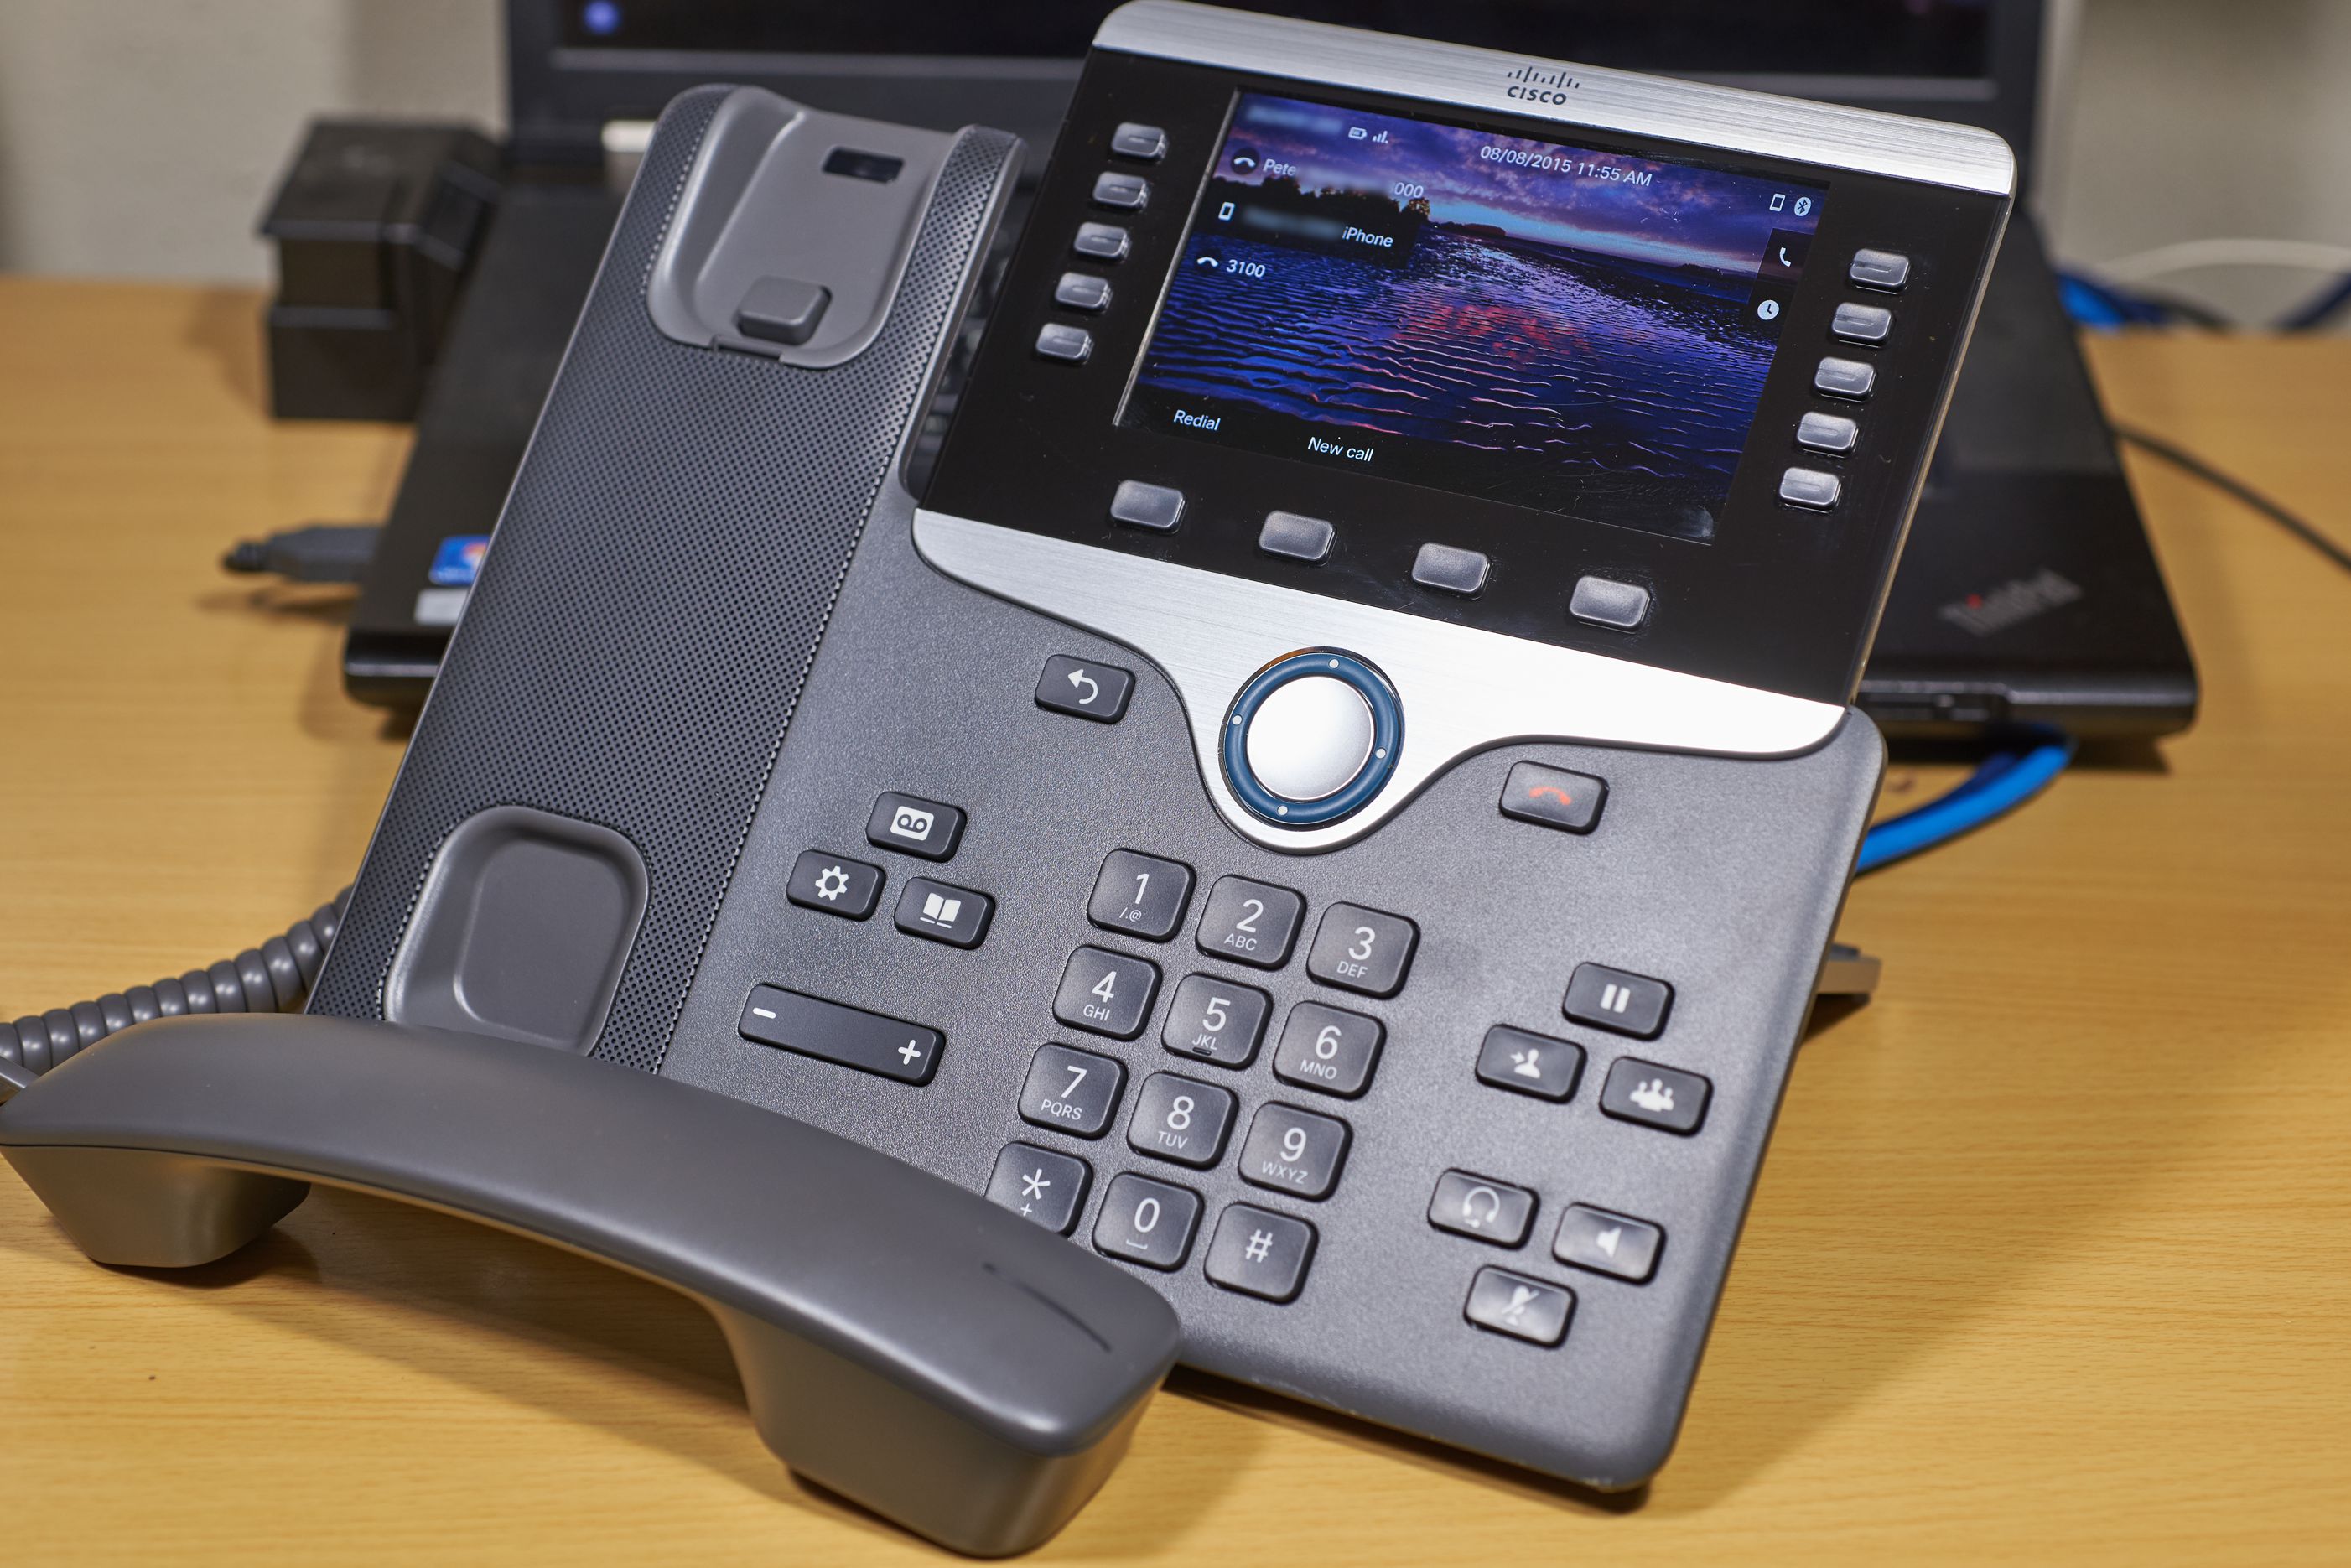
I recently had the opportunity to pick up a couple of 8861s for my lab/home phones, and thought I would do a writeup on my initial impressions. The 8800 series phones offer an updated look, and a number of new features.

The 8800 series also continues the move from soft keys to more hard keys, with hard Back, End Call, Hold, Transfer, and Conference keys added to the Voicemail, Settings (now combined with services), Directories, Headset, Speaker, and Mute buttons on the 7900 series. I don’t know how I feel about the move to more hard keys. Soft keys have the advantage that only the necessary ones are displayed, but sometimes important ones can get buried. Hard keys will also have an advantage when using apps like IP Phone Agent, since the call control soft keys are hidden by the application soft keys.

Also, in keeping with the new Cisco phone lines, they are SIP only, no option for SCCP.

phones-_DSC0386

Continue reading

Time of Day Routing in CUCM

Time of Day routing allows for calls to be treated differently based on the time of day and day of week. This allows for things like automatically rerouting calls to a different destination when the company is closed, not allowing PSTN calls after hours, or requiring a Forced Authorization Code outside of business hours. Another real-world example I have worked with is patient rooms in hospitals, which should not receive outside calls at night.

CUCM uses the standard Partitions and Calling Search Spaces, with the addition of a Time Schedule that specifies when the Partitions will be active, to perform time of day routing. Outside the time schedule, the partition is effectively invisible to call routing. Appropriate ordering of in a CSS allows the calls to be routed to an alternate number when the partition is not available.

An important consideration in designing the Partitions and CSSs is whether you want calls to be able to route to the phone off hours at all. For instance, with the patient room example, should internal numbers be able to call the rooms, and only outside calls be blocked? We will look at two examples, one that allows for some calls to go through, one that does not.

Continue reading

UCCX Work Timer Expired Not Ready Reason Code

I recently ran into a situation where agents in a call center that had a Work timer and reason codes enabled where going into Not Ready with a system reason code: 32758 (Work Timer Expired).

The agents and queue were configured so that the agents would become available again after the work timer, and the majority of the time they were. What we discovered, with TACs help was that these were instances of a non-ACD call in or out to the agent phone being active when the work timer expires.

The agent states in a normal scenario would be as follows: The agent is in a Ready state, a call is presented, and they go into the Reserved state while the phone is ringing. Once the call is answered, they go into the Talking state, followed by the Work state when they hang up, and the 10 seconds later they go into the Ready state.

In the cases where we were seeing “Work Timer Expired,” the agent starts in a Ready state, goes through the reserved and talking states as above, and Work when they hang up. Then they either place an outbound call or receive a call directly to their extension, not through UCCX. Once the work timer expires, they are placed in the Not Ready (Work Timer Expired) state for the duration of the non-ACD call, and when that call is completed, they are returned to the Ready state.

In short, assuming the agent and queue are correctly configured with Auto Available, the 32758 (Work Timer Expired) reason code should be read as equivalent to the non-ACD Call reason code.

Check out my other UCCX posts.

Configuring Local Route Groups

Local Route Groups were introduced in CUCM 7 as a cleaner way to configure PSTN routing for multiple sites. Prior to Local Route Groups, the only way to route calls out a local gateway was to configure a partition for each site, and configure the various PSTN patterns in each one. With local route groups, you can tie a route group to a device pool, and then send route patterns to a route list that includes the “Standard Local Route Group.” Calls matching that pattern will then use the local route group configured for their device pool.

Configuration  example after the cut.

Continue reading

Problems with MoH and Conferencing with Recording Profiles

On a UCM system I have worked on, we were running into problems with both Music on Hold and ad-hoc conferencing when a recording profile was applied to DNs. Music on Hold would not play, and conferences could not be initiated. The problem turned out to be codec related: parts of the call were G.722, parts G.711. Once the recording starts, it locks the codec for the call. If MoH or a conference tries to renegotiate it, you get the behavior we experienced.

To correct this, we chose the option to disable G.722 on the phones that were set to be recorded, so there was no need for codec renegotiation. You could also disable G.722 on the cluster, but the customer did not want to take that option.

Blocking Calls by Caller ID in CUCM

PBX administrators are sometimes called on to block calls coming from specific numbers, such as telemarketers or other harassing calls.

Until Communications Manager 8.x, the only way to block incoming calls based on the calling number was to use an H.323 or SIP gateway, and use translation rules on the gateway to reject the number. While there are still good reasons to do this, starting in 8.0, UCM has the ability to block or reroute based on calling number via the “Route Next Hop By Calling Party Number” feature on translation patterns.

Depending on the circumstances, blocking at the gateway may still be your best option, but by configuring it in UCM, you can apply the same blocked numbers to multiple gateways.

The rest of this post, we will build an example of the configuration described in this Technote.

We are assuming a basic setup with all internal phones in a partition called “Internal_DNs_PT,” a gateway with a CSS “Inbound_Routes_CSS” that searches for translations in a partition called “Inbound_Routes_PT”

Call flow for inbound calls:

  • PRI to MGCP Gateway
  • Receiving 10 digits from Telco
  • Translation pattern in “Inbound_Routes_PT” Translates 123555XXXX to XXXX
  • CSS “Internal_Routes_CSS” finds 4 Digit DNs in the Internal_DNs_PT.

Goal: Block all inbound calls from (890)555-1212.

Step 1: Create a Partition named “Blocked_Numbers_PT” and CSS named “Block_By_Calling_CSS”.

Step 2: Create a Translation Pattern in “Blocked_Numbers_PT,” with a pattern of “!” to match all calls, and a CSS that includes Internal_DNs_PT. This allows any calls not specifically blocked to be routed. No actual number translations should be performed.

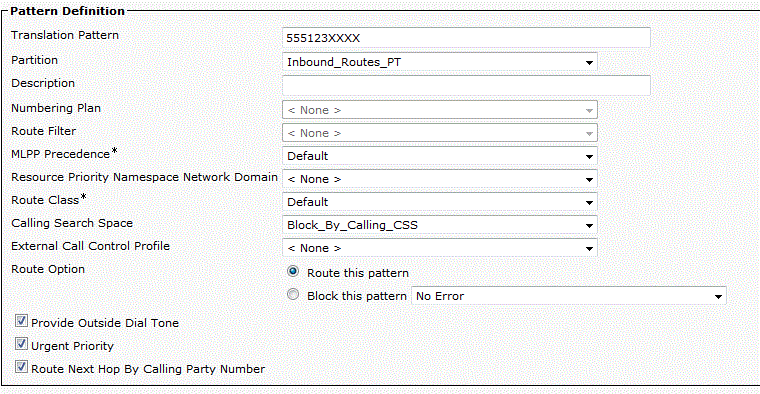
Step 3: Modify the translation pattern in Inbound_Routes_PT to use the Block_By_Calling_CSS, and select the option to “Route Next Hop by Calling Party Number.”

xlate-for-blockingAt this point, a call comes in, 10 digits are presented from the Telco, the translation pattern in Inbound_Routes_PT strips the initial digits to leave the 4 digit extension. UCM then looks in Blocked_Numbers_PT, finds the ! pattern, which does not make any changes, but searches Internal_DNs_PT for the extension, and passes the call on.

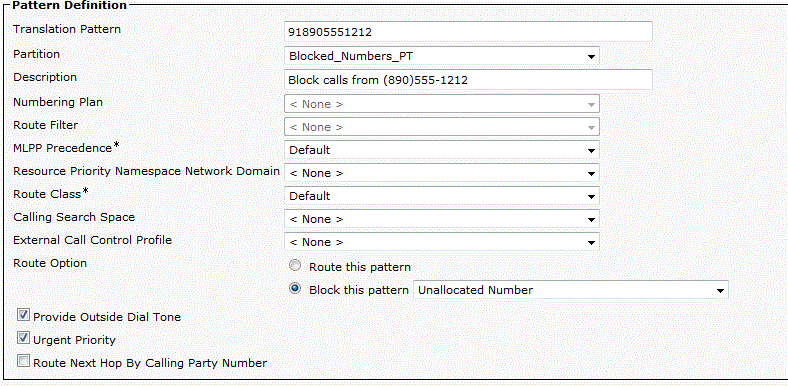
Step 4: Create translation patterns in Blocked_Numbers_PT with the number to be blocked as the pattern, remembering to include any access codes, etc. that the number would have at that point, and the Route Option set to Block This Pattern with the error you want.

blocking-xlate

Alternatively, you could translate the called number to a security officer or something similar. I personally want to route one to Unity Connection or a CCX application playing this recording, but I have never gotten the chance to.

Once you have this configured, you can test it by blocking a number you have control over, like your cell phone, and making sure it is blocked.

If you want to only block calls to a specific number, leave the 123555XXXX to XXXX translation pattern using a CSS searching the Internal_DNs_PT, and then create more specific translations that route through the blocking configuration.

For instance, creating a translation pattern for 1235550987 to XXXX using Block_By_Calling_CSS, and the “Route Next Hop by Calling Party Number” option will only block calls to 1235550987 from the numbers in Blocked_Numbers_PT, but allow those numbers to call other DNs. An instance where you might use this if a FAX machine keeps calling a voice line, and you want to prevent those calls while still allowing FAXs to be sent to legitimate FAX machines.

Interested in learning more about CUCM? Check out our other posts here.

Configuring Users with Mobile Connect (Single Number Reach)

Mobile Connect is Cisco’s trade name for what is often called Single Number Reach, or SNR. It extends a call to a user’s desk phone out to up to ten other phones, such as home and cell phones. This allows an employee to disseminate a single number, which can always be used to reach the user. This benefits customers and business partners, since they don’t need to try multiple numbers to reach someone, and the employee, since there is no way for the caller to know if you are in the office, at home, or on a golf course.

To do this, UCM makes calls to the PSTN for each off net destination, which requires some planning.While a call is being extended, this ties up one channel per remote destination, up to 10, plus the incoming call, if it is a PSTN call. Once the user answers on a remote device, up to 2 channels are taken up, one for the inbound call, one for the remote device, assuming they are both PSTN devices. The additional trunk usage should be taken into consideration before enabling Mobile Connect.

System Setup

The only real non-default setting for mobility is to create a new softkey template that includes the Mobility softkey. Normally, I would copy the “Standard User” softkey template to something like “Mobility User” and add the Mobility softkey to the On Hook, and Connected call states.

User Setup

Setting up Mobile Connect can be a bit frustrating due to some order of operation considerations. To remember the order of operations, I use the mnemonic UPPeD, standing for User, Phone, (Remote Destination) Profile, and (Remote) Destination.

Continue reading

Enterprise License Manager (ELM) Tutorial

Cisco is moving the UC suite to licensing through Enterprise License Manager, or ELM. Currently, Unified Communications Manager and Unity Connection licensing is managed through ELM. IM & Presence is not directly licensed, it is tied to UCM licensing. Other products like Contact Center Express (UCCX) continue to use traditional licensing.

ELM can be run as a co-resident application on UCM or Unity Connection, BE 5000, or BE 6000. It can also be run as a separate server. Cisco recommends a co-resident installation for a single app, and a separate server when running multiple applications, or multiple clusters. Co-resident ELM is supported in any of these configurations, but not recommended.

Co-resident ELM is installed when CUCM or Unity Connection is installed. The stand-alone server is installed from the same media as CUCM and Unity Connection by selecting is in the product to install screen.

We will walk through requesting and apply a demo license, and adding a product instance to ELM.

When you navigate to the IP address or hostname of the server you are running ELM on, you will see the following:

Click “Cisco Enterprise License Manager,” and you get the ELM login.

When you log in, you will get the dashboard, which will show that you are in demo mode until you apply licenses. For this demo, we will get a demo license from Cisco, which include 20 CUWL Pro UCM and Unity Connection licenses, as well as 5 Telepresence rooms.

The first step will be to create a license request in ELM, so expand License Management, and click licenses. ELM is able to register PAKs directly from the interface, as well as plan for licenses and generate requests. In this case, we are going to generate a license request, then use it to request the demo license.
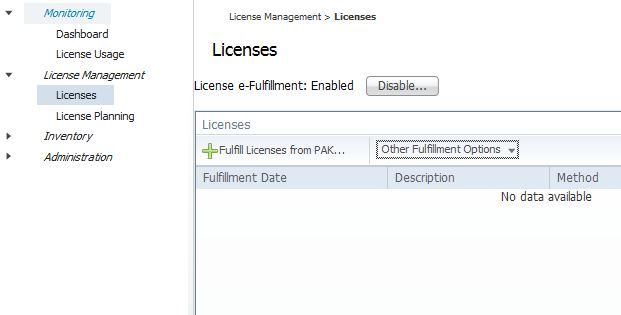
From the licenses screen, select “Other Fulfillment Options,” then “Generate License Request.” The license request window opens.

Copy the text to your clipboard, or download it as a file. Next, we will go to www.cisco.com/go/license, click “Get Demo,” then select “Unified Communications Products,” then “Cisco Unified Communications Demo License Version 9.x.” On the next page, paste in the license request text that was copied from your ELM server, and click “Next.”

On the next page, confirm your email address, registration information, and accept the licensing agreement.

Once you click “Get License,” an email will be sent to you with a zip file attached. Extract the .bin file in the zip file, then go back to the ELM licenses page, and select “Other Fulfillment Options,” then “Fulfill Licenses from File.” Click “Browse,” select the .bin file you downloaded, enter a description if you want, and click “Install.”


Adding a Product Instance to ELM

Now we have the license installed, but the applications are not yet using ELM for licensing. To do this, you add a product instance in ELM. Expand “Inventory,” then click “Product Instances.”

When you click “Add,” The Product Add window opens, allowing you to enter a name, description, IP address or hostname, and authentication information for the product instance you want to add.

The credentials needed are the platform administrator credentials, the ones used for OS Admin, DRS, etc.

When you click OK, ELM will go out to the server you are adding, and update the server to look to ELM for licensing. Once this is done, the page will inform you it is done.

Viewing License Usage in ELM

Once the licenses are synchronized, you can view details of license usage. If licenses at a lower level than those installed are required, the higher level licenses can be borrowed, as seen here. UCM has one user configured, with a single phone, mobility and Presence enabled. This requires an enhanced license, which is “borrowed” from the CUWL Pro licenses that are installed.


Changing the IP address of a server licensed by ELM

One of the benefits of ELM is that you do not need to re-host licenses if you change platform settings, since licensing is no longer tied to a license MAC. However, if you need to change the IP address, you need to follow the proper procedure on ELM. Before you change the IP address, delete the product instance from ELM, follow the proper procedure to update the IP address, and then go through the process to add the product back to ELM. If you do not delete the product instance before updating the IP address, you will get an error adding the instance back into ELM. The fix for this is to run the command “license client reset registration” on the console of the licensed product. Once you run this, the product can be added back into ELM.

Check out the updates for UC 10 Prime License Manager.

Using PHP for Cisco IP Phone Apps

One of the advantages that IP phones have is the ability to create custom applications that can perform any number of functions. PHP and other dynamic web development languages can be used to create a great deal of functionality. The following is a simple application that prints one of three quotes to the phone. PHP or another dynamic language could be used to query databases, websites, etc. for any kind of data you may want accessible from a phone.

The text below was saved as “quote.php” on a PHP enabled web server, and added as a standard XML app. Due to the layout of the blog, you are probably better off copying this into your favorite text editor.

<?php header(‘Content-type: text/xml’); ?> <!– Without this line, the phone will not parse this as XML. Must be the first line of the script –>
<CiscoIPPhoneText> <!– Puts text on the phone screen–>
<Title>Today’s quote is:</Title> <!– This displays on the top, over the main text area–>
<Prompt>Why do you ask?</Prompt> <!– This displays on the bottom, under the main text area–>
<Text> <!– This assigns the actual text on the phone–>

<!– The PHP function defines an array of quotes, and posts one to the text area–>
<?php
$quote = [“To be or not to be, that is the question”, “Everybody comes to Rick’s”, “Follow the white rabbit”];
$rnum = rand(0,2);
print($quote[$rnum]);
?>
</Text>
<SoftKeyItem> <!– Define a softkey. The ones here are the defaults, and the app doesn’t really need them.–>
<Name>Update</Name> <!– The name that displays–>
<URL>SoftKey:Update</URL> <!– The URL or an action–>
<Position>1</Position> <!– The softkey position–>
</SoftKeyItem>
<SoftKeyItem>
<Name>Exit</Name>
<URL>SoftKey:Exit</URL>
<Position>3</Position>
</SoftKeyItem>
</CiscoIPPhoneText>

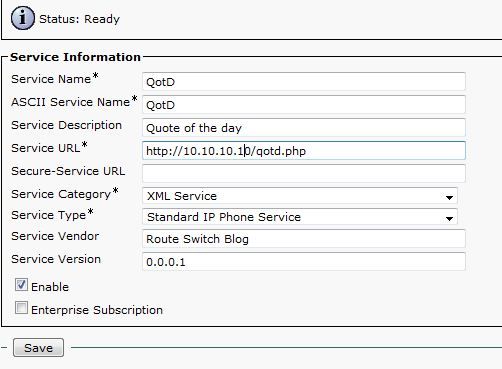
The app is added to CUCM as an XML Service:

The app on a phone:

Also see: Cisco Unified IP Phone Services Application Development Notes, PHP books at Amazon.com